3 Exercises for More Coordinated Pirouettes

Whether you’re aiming for effortless pirouettes onstage or trying not to bump into furniture while training at home, we all want sailing, suspended turns. While many components go into a controlled pirouette—a powerful preparation, a balanced relevé, a stable core and well-placed arms—your whole body must be a strong, solid unit to maintain your position against gravitational and centrifugal forces as you turn.
Kendall Alway, PT, DPT, a former professional dancer and owner of SF Performing Arts Physical Therapy, which treats dancers from San Francisco Ballet and Alonzo King LINES Ballet, says she usually spots weakness in dancers’ cores and then upper bodies. “If your upper body is not strong enough—around your scapular stabilizers, around your shoulder blades and your upper back—then you can’t really stay sufficiently in one piece to do the turn,” she says. The domino effect follows: “If you don’t have sufficient strength to counterbalance the weight of the arms, then you’re more likely to collapse in the lower and upper back. When you collapse that way, then your pelvis tilts.”

Alway recommends the following conditioning exercises for better pirouettes. They can be done at home or in the studio, and target multiple muscle groups at once. “None of these exercises isolate,” says Alway. “They really force you to bring your whole body into alignment, and that’s the important thing for the pirouette.”
Pirouette Perfecter
What it works: This full-body strengthener targets the deep hip rotators, psoas, obliques, hamstrings, glutes and scapular stabilizers to promote stability while you’re spinning.
What you need: Foam roller, or another item that is approximately 6 inches tall
 Photos by Christian Peacock, modeled by Carmela Mayo
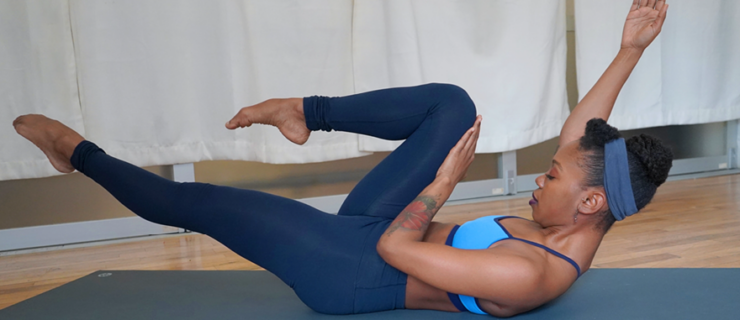
Part 1: From Devant
Starting position: Lie on your back and put your ankles on top of the foam roller, positioned horizontally. Legs should be straight and gently turned out, while your hands rest on your shoulders with your elbows near your waist.
- Bridge your hips up so that your pelvis is lifted off the ground and your body is in a straight line, taut like an arrow.
- Lift your right leg up 90 degrees towards the ceiling, maintaining the lift of the hips.
- Keeping the right leg pointing to the ceiling and your hips lifted, rotate the body in one piece to the left so that you are facing the side wall and your leg is now in an à la seconde position. With the hips and core lifted off the ground to maintain the straight line of the body and leg on the roller, your left shoulder will be taking weight while the left hand stays tucked into the body out of the way. The right palm can come across the body to the floor to help stabilize. (While changing facings, imagine that a string from the ceiling holds your raised foot in one place while you rotate it within your hip socket to face the wall.)
- From that position, complete the next series of slow, controlled movements: Enveloppé the right leg into a turned-out passé, then turn the passé in, turn it out again, and développé back out so the right leg is in à la seconde once more.
- Keeping your hips lifted, return in one piece to your back so that the leg is devant again and both arms are tucked into the starting position. Lower the right leg back to the foam roller, then lower the hips.
- Repeat on the left side. Do 2 sets on each side.
 Photos by Christian Peacock, modeled by Carmela Mayo
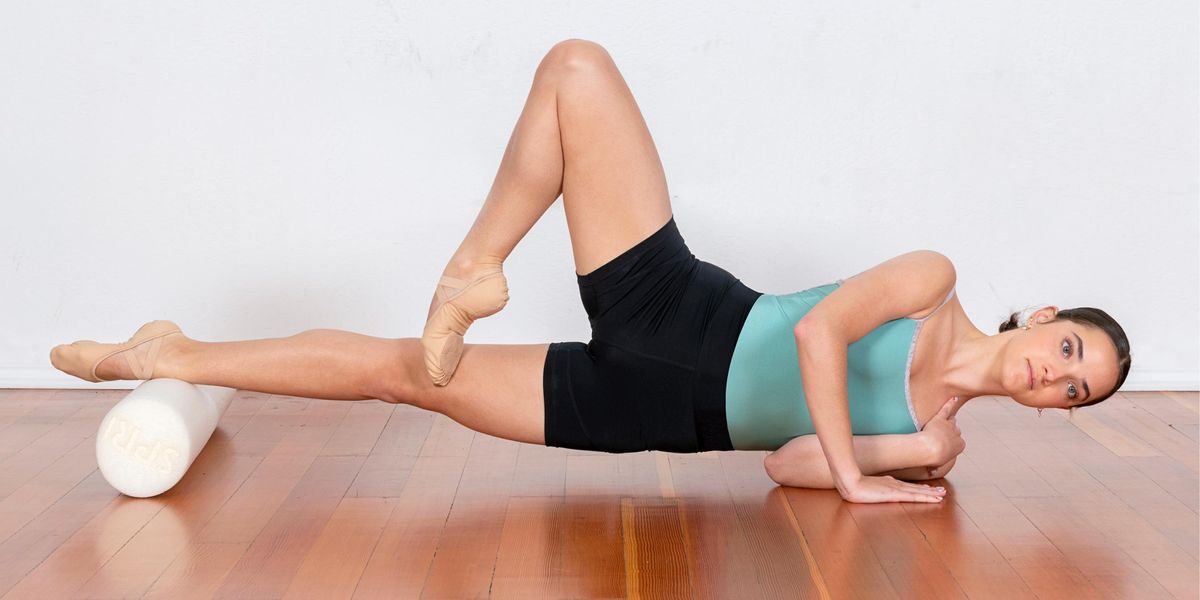
Part 2: From Derrière
Starting position: Lie on your stomach with your ankles on the foam roller. Transition into a plank position on your elbows. Make sure the hips, shoulders and ankles are in one line. (Avoid lifting the hips too high—you shouldn’t be in a pike position.)
- Lift the right leg into arabesque. In derrière, Alway says, the arabesque likely won’t lift 90 degrees to the ceiling behind you, but keep it as high as possible.
- Keeping the hips lifted, rotate your body in one piece, moving from arabesque to à la seconde. The left arm maintains the low plank on the elbow, while the right arm can stay across your body with the fingertips lightly on the floor to help stabilize you. For a greater challenge, you can raise the right arm to the ceiling as you would in a side plank.
- Rotate back to arabesque. Lower the right leg back to the foam roller, then lower the hips.
- Repeat on the left side. Do 2 sets on each side.
Shoulder Stabilizer
What it works: This exercise strengthens the shoulders’ rotator cuffs, your lats and scapular stabilizers, strengthening the carriage of the arms in a turn so that they don’t throw you out of alignment.
What you need: Medium-weight resistance band
Starting position: Stand in parallel. Holding both ends of the band, bring your arms up to a Y position overhead. (Your hands should be about 2 feet apart.)
 Photos by Christian Peacock, modeled by Carmela Mayo
- Lift the right leg into a parallel coupé or passé so that you’re balanced on the left leg.
- Keeping both arms straight and the arm of the standing leg pointing towards the ceiling, pull the right arm down toward the side of your body against the band’s resistance so that it’s parallel to the floor. Bring the band in front of your face as you lower it, and your arm should be slightly in front of your body as well, as an arm in a classically placed second position would be.
- Slowly return to the Y position.
- As you lower and raise the arm, keep a buttoned-up feeling between your ribs and core. Alway says it’s crucial that the back doesn’t arch and the ribs don’t splay outward. If you’re struggling to keep the body in one piece, don’t lower your arm as far.
- Do 10–15 reps, balancing on the left leg the whole time, then switch to the other lifted leg and working arm.
Tendus Against Resistance
What it works: This exercise teaches you to engage your psoas, deep hip rotators and anterior and oblique abs to better position and stabilize the pelvis, which are necessary when pushing off for turns and maintaining a high relevé throughout.
What you need: Medium-weight resistance band
Starting position: With a resistance band tied in a circle around something stable, like a couch leg or with the knot closed in a doorway, loop the band around the right ankle and stand in first position, facing away from the anchored end of the band. This attachment point should be directly behind you, centered between the two legs, and the band should be taut.
 Photos by Christian Peacock, modeled by Carmela Mayo
- In slow, controlled movements, complete a series of tendus with the right leg en croix—front, side, back, side—working against the resistance. (In tendu derrière, the resistance will be on the way in, not out.)
- While completing the tendus, note how easy it is for the body to sway and rotate in reaction to the resistance. Engage your core and stay lifted on top of the standing leg to keep the pelvis still with each movement. Make sure to lift up and work from your turnout muscles.
- Do 4 sets, then repeat on the left side.
Try It Out
Follow along as Alway coaches San Francisco Ballet corps member Carmela Mayo through the exercises.